
An online Booking System is currently being used by the Frimley Green Club and this brief guide will show you how to make the most of it as a customer.
To make a booking request from the weekly calendar or scheduler, click on the + symbol on the date you wish to book. If you are making a booking request for the first time, you will be asked to enter your contact details and a password so that you can track your booking status, any changes that are made, plus view any invoices and payments linked to that booking, much in the same way you would with an online shopping website.

Once you have done this, you will need to complete the rest of the booking request form as follows:
Name: This is the name of the event you are booking.
Start Date/Time: The start date and time of the event. If this is a recurring booking, this is the start date and time of the first event in the series.
End Date/Time: The end date and time of the event. If this is a recurring booking, this is the end date and time of the first event in the series.
TOOLTIPS
On any page in the software, look out for the ? icon – hover over this icon (or tap on mobile) to see more
information about the particular field or section it relates to.
Recurring Booking: If this is a recurring booking for multiple dates, tick this box and choose the booking frequency (eg Daily, Weekly etc), along with how many additional dates you want to add to this series. Individual dates in a series can be amended to a different date or time. Make sure to click on the green Check Availability button. If there is a clash of bookings at any date, time or room, a red error message will display saying ‘The dates of this booking clash with other dates in the calendar, or they don’t end after they begin’. You can then check the weekly calendar or scheduler at the top of the screen to see where the clash is and amend the booking accordingly.
Note: You cannot proceed with creating a booking request while there is a clash.
Activity: This is the general ‘type’ of booking you are making. Choose from the options the venue has setup to indicate what kind of booking this is. If you are unsure what to enter here, contact your venue administrator.
Description: You can put as much or as little information about the event itself, including prices, what to bring and links to websites etc.
Privacy: There are 3 privacy settings for bookings:
- Private: The Weekly Diary and Scheduler will only show the time the event is booked for and whether the booking is Requested or Confirmed. The booking will display as ‘Private Event’ and not show your Event Name, description or your contact details.
- Public – Contact Details Hidden: The Weekly Diary and Scheduler will show the Event Name and a link to the description but will hide your contact details (eg name, email address, telephone number etc), once the booking has been confirmed by an administrator. If the event is still to be confirmed, the calendar will continue to display as
‘Provisional Booking’ - Public: The Weekly Diary and Scheduler will show the Event Name and a link to the description and your contact details, once the booking has been confirmed by an administrator. If the event is still to be confirmed, the calendar will continue to display as ‘Provisional Booking’
Number of People Attending: Here you can indicate how many people are expected to attend your event. The booking form will not require you to enter something here, but you should confirm with the venue if they require this information.
Special Requirements: This can be a list of any specific requirements such as tables and chairs, etc.
Terms & Conditions: If this tick box shows, then the venue has provided a terms and conditions document that you will need to agree to before proceeding with your booking.
Save Booking: Once completed press Save and the request will automatically be sent to the Hall or Venue Administrator for processing, you will also receive an email from us confirming that the request has been sent – this is not confirmation of your booking. You will then be taken to the dashboard to view your bookings and invoices.
Additional Bookings: You can always make other booking requests from the Club or Venue’s Calendar/Scheduler or by using the Request Booking button in the Bookings page of your Dashboard.
View your Bookings, Invoice and Payments: Once logged in to your own account, you will be taken to a list of your bookings where you can see an overview of their dates, times and status, and any invoices that are due for payment.
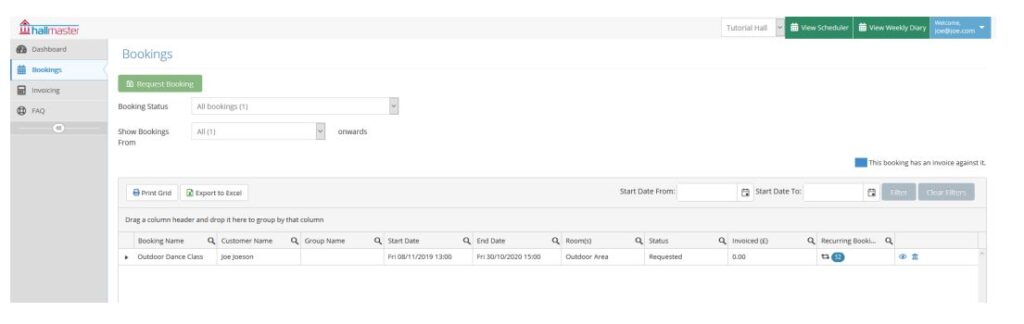
Filtering and Searching: You can easily sort the columns in the booking grid by clicking on the column heading. Eg Booking Name sorts your bookings in ascending/descending order etc.
You can also search for specific bookings using the search icon in each column heading. When a search is being
applied, the icon will change colour to pink. To clear the filter and display all of your bookings, click on the Clear Filters button.
To search for historical bookings, select the range you want to view from the drop-down menu. The older the items,
the longer it will take to load them. If you wish to, you can print the list of your search results for your records.
Download and Print Invoices:
To view, download and print an invoice from your control panel, go to the Invoicing page or click on the blue
Invoicing icon on the far right of the bookings in the Bookings page. You may have already received a copy of these
invoices by email from the Venue.
View Payment History:
When in either of the above Invoicing pages, click on the blue Shopping Cart icon to see a list of payments against each invoice.
Multiple Venues:
You may have bookings with multiple venues that use our software. You can easily change which venue you are
viewing the information for by selecting them from the dropdown menu at the top of the page.